Why You’ll Love This Recipe
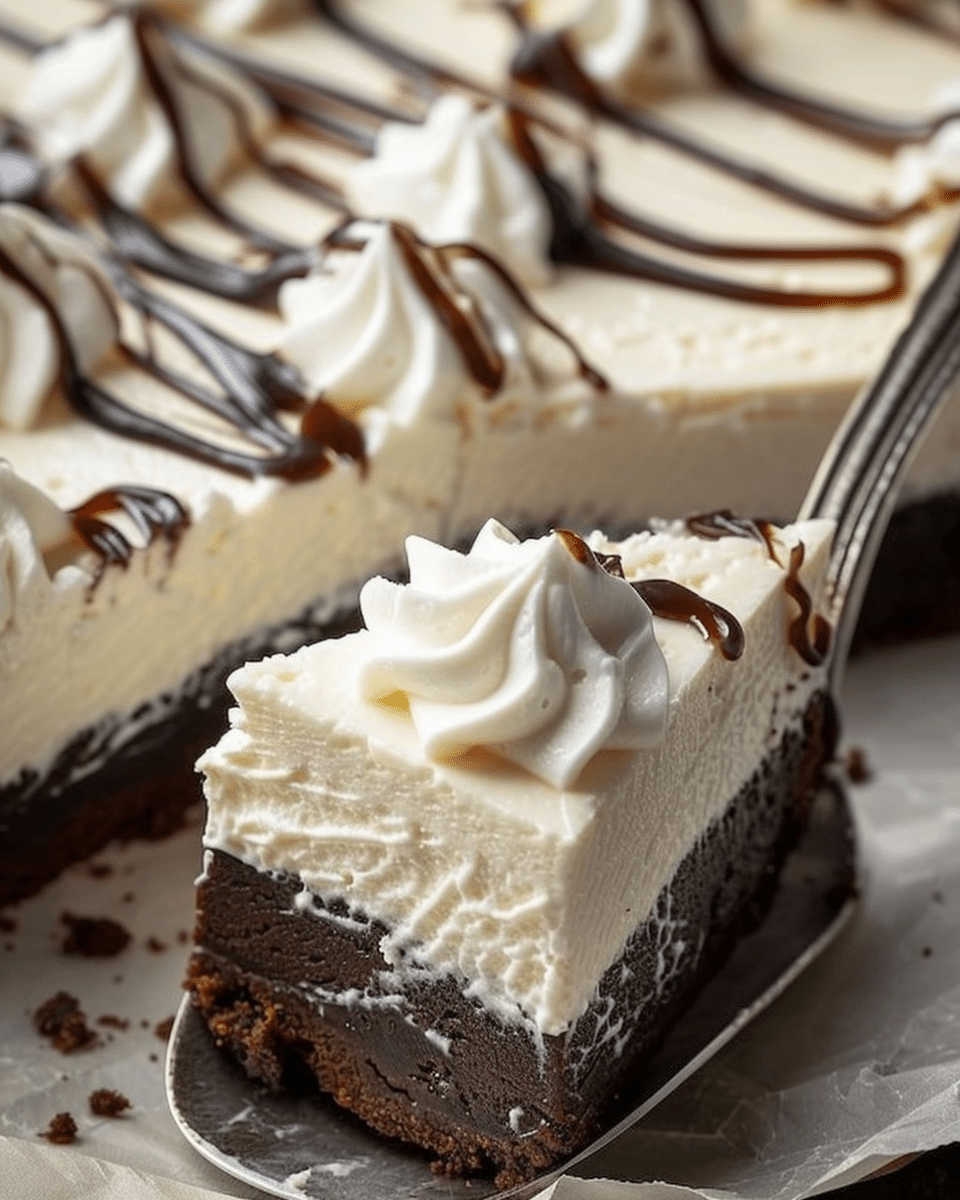
- Decadent Combination: The marriage of dense chocolate brownie and velvety cheesecake offers a luxurious taste experience.
- Visual Appeal: The contrasting layers create an eye-catching dessert that’s as beautiful as it is delicious.
- Versatility: Easily customizable with your favorite mix-ins or toppings to suit any occasion.
- Make-Ahead Friendly: Prepare in advance and refrigerate, making it a convenient option for entertaining.
Ingredients
For the Brownie Layer:
- 1 standard box of brownie mix
- Ingredients as per brownie mix instructions (typically eggs, oil, and water)
- ½ cup chocolate chips (optional)
For the Cheesecake Layer:
- 16 oz. cream cheese, softened
- ⅔ cup granulated sugar
- 1 tablespoon all-purpose flour
- 1 teaspoon vanilla extract
- ¼ cup sour cream, room temperature
- 2 large eggs, room temperature
- ¼ cup heavy whipping cream
(Tip: You’ll find the full list of ingredients and measurements in the recipe card below.)
Directions
- Prepare the Pan: Preheat your oven to 350°F (175°C). Line the bottom of a 9-inch springform pan with parchment paper and grease the sides to prevent sticking.
- Make the Brownie Base: In a mixing bowl, prepare the brownie batter according to the package instructions. Stir in chocolate chips if using. Pour the batter into the prepared pan and bake for 15 minutes, until the top is set.
- Prepare the Cheesecake Layer: While the brownie base is baking, beat the softened cream cheese until light and fluffy. Add granulated sugar and mix until well combined. Incorporate flour, vanilla extract, sour cream, and heavy whipping cream, mixing until smooth. Add eggs one at a time, mixing gently after each addition until just combined.
- Combine Layers: Once the brownie base is set, remove it from the oven and pour the cheesecake mixture over the top, spreading it evenly.
- Bake the Cheesecake: Return the pan to the oven and bake for an additional 45 minutes. After baking, turn off the oven and let the cheesecake sit inside with the door closed for 20 minutes. Then, crack the oven door open and allow it to cool for another 30 minutes.
- Chill: Remove the cheesecake from the oven and let it cool to room temperature. Refrigerate for at least 2-3 hours, or until fully chilled and set.
- Serve: Before serving, you can top the cheesecake with whipped cream and a drizzle of chocolate sauce if desired.
Servings and Timing
- Servings: This recipe yields approximately 16 slices.
- Preparation Time: 30 minutes
- Cook Time: 1 hour
- Cooling and Chilling Time: Approximately 5 hours (including cooling and refrigeration)
Variations
- Flavor Twists: Add a swirl of caramel or raspberry sauce to the cheesecake layer before baking for a fruity or caramel-infused flavor.
- Nutty Addition: Fold in chopped nuts like pecans or walnuts into the brownie batter for added crunch.
- Chocolate Overload: Use a chocolate cheesecake layer instead of plain for an extra chocolaty dessert.
Storage/Reheating
- Storage: Cover the cheesecake and store it in the refrigerator for up to 3 days.
- Freezing: To freeze, place the cooled cheesecake on a baking sheet and freeze until firm. Then, wrap it tightly in plastic wrap and foil. Freeze for up to 1 month. Thaw in the refrigerator overnight before serving.
FAQs
1. Can I use homemade brownie batter instead of a mix?
Yes, you can substitute with your favorite homemade brownie recipe. Ensure it’s scaled to fit a 9-inch pan.
2. Do I need to use a water bath for this cheesecake?
This recipe doesn’t require a water bath. Cooling the cheesecake gradually in the oven helps prevent cracks.
3. Can I make this cheesecake gluten-free?
Absolutely! Use a gluten-free brownie mix and ensure all other ingredients are gluten-free.
4. What toppings pair well with this cheesecake?
Fresh berries, caramel sauce, or a dusting of cocoa powder complement the rich flavors nicely.
5. How long should I let the cheesecake cool before refrigerating?
Allow it to cool to room temperature before refrigerating, which usually takes about an hour.
6. Can I add flavors to the cheesecake layer?
Yes, you can mix in flavors like lemon zest, almond extract, or melted chocolate to customize the taste.
7. Why did my cheesecake crack on top?
Cracking can result from overbaking or rapid temperature changes. Following the cooling instructions helps minimize this risk.
8. Is it okay to use low-fat cream cheese?
For the best texture and flavor, full-fat cream cheese is recommended.
9. Can I bake this in a regular cake pan?
A springform pan is ideal for easy removal, but a well-greased and parchment-lined cake pan can work in a pinch.
10. How do I know when the cheesecake is done baking?
Conclusion
This Brownie Bottom Cheesecake is a show-stopping dessert that combines two beloved treats into one irresistible package. Its rich flavors and creamy texture make it a perfect choice for special occasions or whenever you’re craving something indulgent. Enjoy experimenting with different variations and toppings to make it your own!
Brownie Bottom Cheesecake
Indulge in the ultimate dessert experience with this Brownie Bottom Cheesecake. Featuring a rich, fudgy brownie base topped with a creamy, tangy cheesecake layer, this treat offers a delightful contrast in both texture and flavor. Perfect for special occasions or as a decadent end to any meal, this dessert is sure to impress.
- Prep Time: 20 minutes
- Cook Time: 1 hour 15 minutes
- Total Time: 5 hours 35 minutes (including chilling time)
- Yield: 12 servings
- Category: Dessert
- Method: Baking
- Cuisine: American
- Diet: Vegetarian
Ingredients
For the Brownie Layer:
- 1 (18-ounce) box brownie mix
- Ingredients as per brownie mix instructions (typically oil, water, and eggs)
- 1/2 cup chocolate chips (optional)
For the Cheesecake Layer:
- 16 ounces cream cheese, softened
- 1/2 cup granulated sugar
- 1/2 cup sour cream
- 2 large eggs, at room temperature
- 1 teaspoon vanilla extract
Instructions
-
Prepare the Pan: Preheat your oven to 350°F (175°C). Grease a 9-inch springform pan and line the bottom with parchment paper.
-
Brownie Layer: Prepare the brownie batter according to the package instructions. Stir in chocolate chips if using. Pour the batter into the prepared pan, spreading it evenly. Bake for 20-25 minutes, or until a toothpick inserted into the center comes out with a few moist crumbs. Remove from the oven and let it cool slightly. Reduce the oven temperature to 325°F (160°C).
-
Cheesecake Layer: In a large bowl, beat the softened cream cheese and granulated sugar until smooth and creamy. Add the sour cream, eggs, and vanilla extract, and mix until well combined. Pour this mixture over the cooled brownie layer, spreading it evenly.
-
Bake: Place the pan back into the oven and bake for 45-50 minutes, or until the edges are set and the center is slightly jiggly. Turn off the oven, crack the door open, and let the cheesecake cool inside for 1 hour.
-
Chill: Remove the cheesecake from the oven and let it cool to room temperature. Then, refrigerate it for at least 4 hours, preferably overnight, to allow it to set completely.
-
Serve: Once chilled, remove the cheesecake from the springform pan. Slice and serve as is, or top with your favorite sauces or whipped cream.
Notes
-
Room Temperature Ingredients: Ensure that all refrigerated ingredients are at room temperature before mixing to achieve a smooth, lump-free batter.
-
Avoid Overmixing: Mix the cheesecake batter just until the ingredients are combined to prevent incorporating too much air, which can cause cracks.
-
Water Bath Alternative: To prevent cracks without using a traditional water bath, place a baking tray filled with water on the rack below the cheesecake during baking to create a humid environment.
-
Cooling Process: Allowing the cheesecake to cool gradually in the oven helps prevent cracks on the surface.
-
Storage: Store any leftovers in an airtight container in the refrigerator for up to 5 days.


