Why You’ll Love This Recipe
- No baking required—perfect for warm days or when you want a hassle-free dessert
- Combines the creamy texture of cheesecake with the bold flavors of tiramisu
- Make-ahead friendly, allowing flavors to develop beautifully overnight
- Elegant and impressive, yet easy to prepare
- Perfect for coffee lovers and cheesecake enthusiasts alike
Ingredients
(Tip: You’ll find the full list of ingredients and measurements in the recipe card below.)
- Ladyfingers
- Strong brewed coffee or espresso
- Mascarpone cheese
- Cream cheese
- Heavy whipping cream
- Powdered sugar
- Vanilla extract
- Instant espresso powder (optional, for extra coffee flavor)
- Cocoa powder (for dusting)
- Gelatin (optional, for added stability)
Directions
- Prepare the Base – Dip the ladyfingers briefly in brewed coffee and arrange them at the bottom of a springform pan, creating an even layer.
- Make the Cheesecake Filling – Beat mascarpone cheese, cream cheese, powdered sugar, and vanilla extract until smooth and creamy.
- Whip the Cream – In a separate bowl, whip the heavy cream to stiff peaks, then gently fold it into the mascarpone mixture. If using gelatin, dissolve it in warm water and mix it into the filling for extra stability.
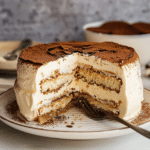
- Assemble the Layers – Spread half of the cheesecake mixture over the ladyfingers. Add another layer of coffee-dipped ladyfingers, followed by the remaining cheesecake mixture.
- Chill – Cover and refrigerate for at least 6 hours, preferably overnight, to allow the flavors to meld and the cheesecake to set.
- Dust with Cocoa Powder – Before serving, dust the top generously with cocoa powder for a classic tiramisu touch.
- Serve – Slice and enjoy your creamy, coffee-infused dessert!
Servings and Timing
- Servings: 8-10
- Prep Time: 30 minutes
- Chill Time: 6-8 hours
- Total Time: 6 hours 30 minutes
Variations
- Alcoholic Version – Add a splash of coffee liqueur (like Kahlúa) or Marsala wine to the coffee for an authentic tiramisu flavor.
- Chocolate Twist – Add a layer of chocolate ganache between the cheesecake and ladyfingers for extra indulgence.
- Lighter Option – Use Greek yogurt or light cream cheese instead of full-fat mascarpone for a less rich version.
- Nutty Addition – Sprinkle crushed almonds or hazelnuts between layers for a bit of crunch.
- Individual Servings – Assemble the tiramisu cheesecake in small glass jars for a cute, single-serve dessert.
Storage/Reheating
- Refrigeration: Store in an airtight container in the fridge for up to 4 days.
- Freezing: Wrap the cheesecake tightly in plastic wrap and store it in the freezer for up to 2 months. Thaw in the fridge overnight before serving.
- Reheating: This dessert is best served chilled, so no reheating is necessary.
FAQs
How long does no-bake tiramisu cheesecake take to set?
It needs at least 6 hours in the fridge, but overnight is best for optimal flavor and texture.
Can I make this cheesecake without mascarpone?
Yes, you can substitute mascarpone with full-fat cream cheese, though the taste will be slightly different.
What kind of coffee should I use?
Strong brewed coffee or espresso works best for that authentic tiramisu flavor.
Do I need gelatin to make this cheesecake?
Gelatin helps stabilize the filling, but it’s optional. The cheesecake will still set without it.
Can I use store-bought ladyfingers?
Yes! Store-bought ladyfingers (savoiardi) are perfect for this recipe.
How do I prevent the cheesecake from being too runny?
Make sure to whip the heavy cream to stiff peaks and don’t over-soak the ladyfingers in coffee.
Can I add a coffee liqueur?
Absolutely! Adding coffee liqueur like Kahlúa enhances the tiramisu flavor.
How do I make clean slices?
Use a sharp knife and wipe it clean between slices for neat, professional-looking cuts.
Can I make this dessert ahead of time?
Yes! In fact, it tastes even better when made a day in advance.
What can I use instead of ladyfingers?
Graham crackers or vanilla wafers can work in a pinch, though the texture will be different.
Conclusion
No-bake tiramisu cheesecake is the perfect dessert for coffee lovers who crave a creamy, indulgent treat. With layers of mascarpone, coffee-soaked ladyfingers, and a luscious cheesecake filling, this dessert is a guaranteed crowd-pleaser. Whether you’re making it for a special occasion or simply treating yourself, it’s an easy yet impressive recipe that delivers on flavor and texture. Try it today and enjoy the best of both cheesecake and tiramisu in one delightful bite!


