

Why You’ll Love Stabilized Whipped Cream Recipe
This stabilized whipped cream is a great choice when you want a topping that is both elegant and practical. It pipes beautifully, spreads easily, and holds up far better than regular whipped cream. The flavor is rich and creamy with just the right amount of sweetness, and the vanilla adds a classic bakery-style finish.
You will also love how versatile this recipe is. It can be used for frosting cakes, topping fruit, filling pastries, or decorating desserts ahead of time. Whether you use gelatin, instant clearjel, or vanilla pudding powder as the stabilizer, you will get a whipped cream that is sturdy without feeling heavy.
Ingredients
(Tip: You’ll find the full list of ingredients and measurements in the recipe card below.)
- 480 mL heavy cream (2 cups, 35% fat)
- 50 g white sugar (¼ cup, adjust to your taste)
- 2 tsp vanilla extract
- ⅛ tsp sea salt
- 2 tsp gelatin powder (about 6 g)
- 2 tbsp water (30 g)
- 30 to 45 mL heavy cream (2 to 3 tbsp, to temper gelatin)
- 2 tsp instant clearjel (or)
- 1 tbsp instant vanilla pudding powder
Directions
Choose your preferred stabilizer before you begin. This recipe gives you options, so you can use gelatin, instant clearjel, or instant vanilla pudding powder depending on what you have on hand.
To prepare the gelatin, sprinkle the gelatin powder over the water in a small microwave-safe bowl. Stir it well, then let it sit for 10 to 15 minutes so it can fully bloom and hydrate.
Heat the bloomed gelatin in the microwave in 10-second intervals until it is fully dissolved. Do not let it boil. It melts quickly, so this usually takes about 20 to 30 seconds.
Stir the hot gelatin while slowly adding 1 tablespoon of heavy cream at a time. This tempers the gelatin and lowers its temperature, while keeping it smooth and pourable.
Place the chilled heavy cream in a mixer bowl fitted with a whisk attachment. Add the sugar, salt, and vanilla extract.
Begin whisking on a low speed, then gradually increase to high. As the cream starts whipping, slowly stream in the tempered gelatin mixture so it blends in immediately. Pour carefully to avoid splashing the gelatin onto the bowl, where it can set too fast and create lumps.
After adding the gelatin, continue mixing for about 30 seconds to help it disperse evenly throughout the cream. Then reduce the speed to medium.
Keep whisking while watching the texture closely. The cream will first thicken, then reach soft peaks, where the tip folds over completely. As it continues, it will move into medium peaks, where the peak bends but still holds some shape.
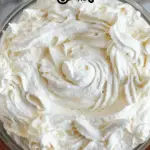
Once the cream reaches medium peaks, lower the speed or finish by hand with a whisk. Continue until it reaches stiff-ish peaks. At this stage, the whipped cream should be thick, smooth, creamy, and stable, with peaks that stand mostly upright and only curl slightly at the tip.
If the stabilized whipped cream starts to set too much while sitting, gently stir it with a spatula to smooth it out again.
For the best texture, transfer the whipped cream to a piping bag only when you are ready to use it. Letting it sit too long in the bag can slightly change the texture, though it can usually be stirred back into shape.
Servings and timing
This recipe makes about 30 servings, making it a great option for large cakes, dessert trays, or party prep.
The total time is 36 minutes, which includes blooming the gelatin, dissolving it, and whipping the cream to the proper consistency.
Variations
For a classic stabilized whipped cream, use the gelatin method for the most reliable structure and clean flavor. This version works especially well for piping decorations and frosting layered desserts.
If you want a quicker option, instant clearjel is a convenient alternative. It helps create a stable texture without the need to bloom or melt gelatin.
Using instant vanilla pudding powder adds a bit more sweetness and a slightly fuller flavor. This variation works well for dessert fillings and toppings where a light vanilla pudding note is welcome.
You can also customize the flavor by adding almond extract, citrus zest, cocoa powder, espresso powder, or a touch of cinnamon. Just be careful not to add too much liquid flavoring, as it can affect the texture.
Storage/Reheating
Store stabilized whipped cream in an airtight container in the refrigerator. It is best used fresh, but it will hold up better than regular whipped cream and can usually be kept for 2 to 3 days.
If it becomes slightly firm or loses some of its smoothness after chilling, gently stir it with a spatula or whisk by hand to bring back a creamier texture.
This recipe does not need reheating. In fact, heat will cause the whipped cream to lose its structure, so it should always be kept chilled until ready to serve.
FAQs
What is stabilized whipped cream?
Stabilized whipped cream is whipped cream made with an added ingredient that helps it hold its shape longer. This makes it better for piping, frosting, and making desserts in advance.
Why do I need to stabilize whipped cream?
Regular whipped cream can deflate or weep fairly quickly. Stabilizing it helps the cream stay fluffy, smooth, and neatly shaped for a longer period.
Can I make this recipe ahead of time?
Yes, this recipe is great for making ahead. Because it is stabilized, it keeps its texture better than standard whipped cream and works well for advance dessert prep.
What does gelatin do in whipped cream?
Gelatin helps the whipped cream keep its structure. It gives the cream extra support so it stays firm without becoming overly dense.
Can I use instant pudding powder instead of gelatin?
Yes, instant vanilla pudding powder can be used as an alternative stabilizer. It can add extra sweetness and a slight pudding-like flavor to the whipped cream.
How do I know when the whipped cream is ready?
The whipped cream is ready when it reaches stiff-ish peaks. The peaks should mostly stand upright, with just the tip folding over slightly, and the texture should be smooth and thick.
What happens if I overwhip the cream?
Overwhipping can make the whipped cream grainy and too dense. If you whip too far, it may start moving toward a buttery texture.
Can I pipe this whipped cream onto cakes and cupcakes?
Yes, this stabilized whipped cream is excellent for piping. It holds decorative shapes much better than regular whipped cream, making it ideal for cakes, cupcakes, and pastries.
Why did my gelatin clump in the cream?
Gelatin can clump if it cools too much before being added or if it splashes onto the side of the bowl instead of blending right into the moving cream. Tempering it properly helps prevent this.
Can I freeze stabilized whipped cream?
It can be frozen in some dessert applications, but the texture may change slightly after thawing. For the best results, use it fresh from the refrigerator rather than freezing it on its own.
Conclusion
Stabilized whipped cream is a simple but incredibly useful recipe that gives you the beauty of freshly whipped cream with much better staying power. It is smooth, creamy, easy to customize, and perfect for decorating or filling desserts ahead of time. Once you make it this way, it may become your go-to whipped cream for everything from celebration cakes to everyday treats.
Stabilized Whipped Cream

5 Stars 4 Stars 3 Stars 2 Stars 1 Star
No reviews
This stabilized whipped cream is light, fluffy, and holds its shape for longer periods, making it perfect for piping and decorating desserts. Made with gelatin, it stays smooth and creamy without deflating quickly.
- Author: Emily
- Prep Time: 20 minutes
- Cook Time: 16 minutes
- Total Time: 36 minutes
- Yield: 30 servings
- Category: Dessert
- Method: Whipping
- Cuisine: International
- Diet: Vegetarian
Ingredients
- 480 mL heavy cream (2 cups, 35% fat)
- 50 g white sugar (¼ cup, adjust to your taste)
- 2 tsp vanilla extract
- ⅛ tsp sea salt
- 2 tsp gelatin powder (about 6 g)
- 2 tbsp water (30 g)
- 30 – 45 mL heavy cream (2 – 3 tbsp, to temper gelatin)
- 2 tsp instant clearjel (optional)
- 1 tbsp instant vanilla pudding powder (optional)
Instructions
- Choose your preferred stabilizer option (gelatin, instant clearjel, or pudding mix).
- Sprinkle the gelatin powder over the water in a small microwave-safe bowl. Stir and let it bloom for 10–15 minutes.
- Heat the bloomed gelatin in the microwave in 10-second bursts until fully dissolved, without boiling.
- Stir the melted gelatin while slowly adding 2–3 tablespoons of heavy cream, one tablespoon at a time, to temper it.
- Add the chilled heavy cream to a mixer bowl fitted with a whisk attachment.
- Add sugar, vanilla extract, and salt to the cream.
- Begin whisking on low speed, gradually increasing to high.
- Slowly stream in the gelatin mixture while mixing, ensuring it incorporates smoothly without clumping.
- Continue mixing for about 30 seconds to fully disperse the gelatin.
- Reduce speed to medium and continue whisking.
- Whip until soft peaks form, then continue to mid peaks.
- Lower the speed or switch to manual whisking as it approaches stiff peaks.
- Stop whisking once stiff-ish peaks form; the cream should be thick, smooth, and slightly firm.
- If the cream starts to set, gently stir with a spatula to smooth it out.
- Transfer to a piping bag just before use for best texture.
Notes
- Keep all ingredients and equipment cold for best results.
- Do not overheat gelatin or it may lose effectiveness.
- Use instant clearjel or pudding mix as alternative stabilizers if preferred.
- Whipped cream can be re-smoothed by gentle stirring if it firms up too much.
- Best used fresh but can hold shape longer than regular whipped cream.
Nutrition
- Serving Size: 2 tbsp
- Calories: 80 kcal
- Sugar: 3 g
- Sodium: 15 mg
- Fat: 7 g
- Saturated Fat: 4.5 g
- Unsaturated Fat: 2 g
- Trans Fat: 0 g
- Carbohydrates: 3 g
- Fiber: 0 g
- Protein: 0.5 g
- Cholesterol: 25 mg